Waterfall card tutorial + In This Together Stamp set Stampin Up!
September 18, 2015
Making
a Waterfall card is fun and easy once is understood how to cut all the pieces
and how to put them together. I made a video tutorial to show you how to
make the card in the picture below but I have to say that I struggled with the
explanation in English :( so sorry about that as it took a while to find my way to explain the
process with 345 words I know in English and still wasn’t enough. However, I
really hope the video gives you an idea about how to create your own waterfall
cards in any size and perhaps mini album/cards?
I say minialbum cards as waterfall cards gives you the opportunity to add long messages or a secuence of sentiments and images that complements each other to build a story, so that waterfall cards could be great for perzonalised projects, to add pictures and messages on each pannel and create a wonderful project life mini album.  |
| I used blender pens and Stampin Up inks to add colour to the images. click to watch video -colouring technique with blender pens and ink pads. |
 |
| I used " In This Together" Stamp set from stampin up for the main images. |
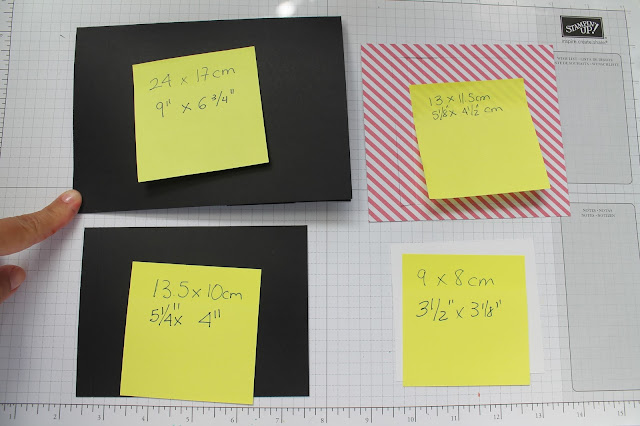
Card pieces and measuraments
 |
| Pieces for the pannels in the waterfall. |
 |
| central piece -base for the card mechanism. |


14 comments
Bibi, thank you so much for sharing. I can't wait to give this a go!
ReplyDeleteWOW!!!!!!!! you're so talented, I really, really enjoyed your tutorial! Thankyou for sharing it with us all! X
ReplyDeleteSome of your measurements on the pink stripe piece is missing. By that I mean the cut lines. It looks like 1 1/2 inches from left side, 3/8th of an inch top and bottom. Not sure how far to cut across to.
ReplyDeleteHi, thanks for stopping by. Measurement of top and bottom are in the last picture. Left side is about 1" inche but not 100% necessary. I mean it could be less or more. Won't affect the card mechanism. Once you make 1 card you will understand how to make it work and the frame for the mechanism can be done any size. I hope that makes a bit of sense. I struggle with the explanation as my English is not good enought. X Bibi
ReplyDeleteBeautiful waterfall cards. Love that the flaps are bigger than the original/typical version and that it is sideways. TFS your great tutorial.
ReplyDeletePS! I esp. love the added decorative detail of the frame around the mechanism that attaches to the card front. Great idea!
ReplyDeleteAwesome! You explained very well!
ReplyDeleteloved it
ReplyDeleteLoved your video on YouTube for the waterfall card. Your video is the one, that helped me understand the best. I marked it & pinned it on pinterest many times. Your accent is wonderful to listen to. It doesn't distract from the tutorial at all. In fact, for me, it enhances it. Thank you so much for your time in sharing & helping me to understand. I will be following you on all of the places you post & share. God's blessings on you. Thanks again.
ReplyDeleteoh dear! thank you very much for such kind comment. It is all my pleasure. lots of love for you. x Bibi
DeleteI love your video and i like your accent. Your voice also very calming to hear...thanks for the tutorial and i definitely will give it a try...
ReplyDeleteBibi - For some reason I am not getting the stripped piece. I have watched both of your videos and have made three and none of them are working. Any suggestions? It is not you. It is me and I am not understanding how to cut the first cut and the sides. Any suggesions?
ReplyDeleteLinda D.
Linda sorry I got confused with your other comment. The frame in this card measures 1/4" not 3/8" . Sorry. That's might be the issue if you are making exact same card size ...please have a look at the pictures above with the pieces of the card and measurements . I fail to explain how to make this piece in the video and I need to make another video to explain better . Now that I speak slightly better English . As well is important to use thick scrapbook paper or vey thin cardstock for that stripped piece. It seems the mechanism doesn't move smoothly when this piece is made out of thick cardstock . Email me at bibicameron@gmail.com with pictures perhaps I can see what is wrong and help you . Hugs x Bibi
DeleteThanks for your tutorial Bibi! All was clear and my result is amazing!
ReplyDeleteThanks for your comments.