Twisted Stamping and Detailed Heat Embossing
July 09, 2017
I'll dare to say that any stamper would be tempted to stamp decorative edges on cards, picture frames, scrapbook pages.. etc with the large floral image from Zen Floral Stamp Set by Honey Bee .
The image is beautiful as it is but why not twist it a little bit to fit the shape of an edge die and make something a bit more dynamic?
The image is beautiful as it is but why not twist it a little bit to fit the shape of an edge die and make something a bit more dynamic?
The image also has small intricate details and I thought it was a very bad idea to heat emboss it with black embossing powder but I still did it. I was curious to see how this "new detailed powder" yet to be released by Tonic Studios would work on these kinds of images and ....
Pictures don't lie! You can even see the small embossed dots in the flower petals.
The powder covered the image smoothly and beautifully . Mess free for a black powder and these detail powders will be available soon in gold, white, copper, silver and clear as well.
Top Tip: use anti-static powder (embossing body - powder tool) before stamping with the Versamark clear ink and applying the powder.
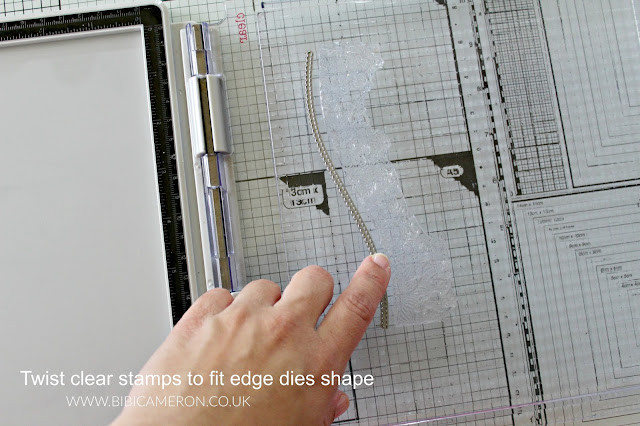
In the picture below you can see how I lay down the stamp to get the perfect fit to that specific die. You can use a stamping platform or "very thin" clear blocks to get a better impression in one go.
Once the stamp is in place I simply placed a piece of cardstock ( 14x9.5 cm) , I applied anti- static powder and I stamped using clear versamark ink and the black detailed powder I talked about above.
More Tips :
- Use a sheet of funky foam underneath the cardstock to get a better impression.
- If you want to try twisted stamping with clear blocks use a slim block or a very thin clear block as they are flexible and they will help you to get that perfect stamped image in one go.

I also sponged the background using SSS Surf Blue ink and I splattered it with the ink of the Nuvo Aqua Flow Black Pen diluted with water.
I die cut the panel using Wonderful - Honey Cut Die and 1 of the 3 dies from SSS Wavy Scallop Stitches Dies.
I also cut the word "wonderful" out of a mirror card called Craftperfect Glossy black - High Gloss by Tonic Studios and to complete the sentiment I used some of the words of Bee-You-Tiful Stamp Set by Honey Bee Stamps.
I added colours to the florals with Nuvo Brush Script Pens and Nuvo Water Brushes.
I applied Nuvo Glue Pen Right at the edge of the die cut and once the glue was dry I added Nuvo Sparkle dust - Paradise blue.
I glued the panel on craft foam and I pasted on a stamped piece of smooth cardstock, Then I pasted the panel on a C6 black card base and I embellished with Mermaid Sequins by Honey Bee stamps
That's all...
I really hope you enjoyed my project. If you would like to place an order for any of the products used or any other craft supply simply click on any of the images below to go direct to online shops 24/7. Affiliate links apply. I get a small commission when you buy through these links at no extra cost to you.
Thanks for your support.
x
Bibi


0 comments
Thanks for your comments.