ok.😌
golf ball!!!! in. the connor

Hello crafty friends,
I hope you are doing terrific. Thanks for stopping by!!!
I can't believe I'm writing my last blog post here. This blog was home to my first projects and also a step into the professional crafty word.
It feels like moving out of the house I grew up in. Literally, It feels that way!
Click here to visit my new blog. See you there!
Happy crafting.
x
Bibi
Hello there, today I'm sharing three cards made using Big & Bold A Queen's Crown Stamp set by Colorado Craft Company.

Big & Bold A Queen's Crown is a gorgeous 6x6 inches stamp set. It contains 9 individual stamps.

The large crown measures 5-1/2 x 4-1/4 inches. It will fully cover the front panel of a C6 card.
- All my cards today measures 6" x 4-1/2" inches.
- They were made out of Neenah Solar Crest 80L
- I embellished all the cards today using Nuvo Gemstones or sequins (listed below)
Top Folding Cards

Distress Ink Background
- For this card, I used Wow Special Bonding Embossing Powder. Then I melted it with a heat gun and I pressed Gold Gilding Flakes onto it.
- I brushed the excess and heat again to set.
- Note: heat up again and as you go to keep the embossing powder sticky.
- After applying the gilding Flakes, I used a Nuvo Precision Brushes to apply distress ink at the background. I used Fired Brick, then I applied Aged Mahogany
Only embossing
This card was made using fine different kinds of gold embossing powders: fine and thick grain.

I used Nuvo Fine Detail embossing powder and Heat It Up Gold embossing powder, this last one is a very old embossing powder I have in my stash since forever.

Nuvo Fine Detail provides a smooth look and the other powder produces a lot more texture.

Side Folding Card

Distress Ink Stamping
I also wanted to use distress inks.
- So I first stamped the whole crown using Fired Brick, then I applied Aged Mahogany over the edges of the stamp to create darker edges and then to darken the edges a lot more I used Black Sooth Ink.
- I stamped the banner using Simon Says Stamp Black Ink.

Thas all for today, I hope you like these ideas
Happy Stamping!
Hugs
Hugs
x Bibi
Supplies List
Just a note to let you know that when you buy through the links in my blog, I get a small commission at no extra cost to you.
Thanks for your support!
Spellbinders
4 EASY PAPERCRAFT IDEAS With Elegant Twist Die Collection by Becca Feeken
July 02, 2020Hi there, I have been invited by Spellbinders to share ideas using Elegant Twist the latest die collection by Becca Feeken and today I'm sharing 4 easy projects here in my blog and also over the Spellbinders blog.

Decorative Basic Shapes Dies with an Elegant Twist
For today, I planned to show different options to use any die from Elegant Twist die collection to create subtle decorative elements or accents to your papercraft projects.
There are five die new sets available and one glimmer hot foil set :
For the projects today, I also used "Handing You a Smile - Spellbinders Small Die of the Month- June 2020", sadly this die set is not available any longer but the Small Die- July 2020 contains similar floral dies.
Becca's Hot Foiled Sentiments
I also added a foiled banner to the projects today using sentiments from Elegant Twist Borders and Sentiments Glimmer Hot Foil Plates. They are gorgeous!
I used Moondust Glimmer Foil and Polish Brass Glimmer Foil as well.
Elegant Twist Decorative Rectangular Background
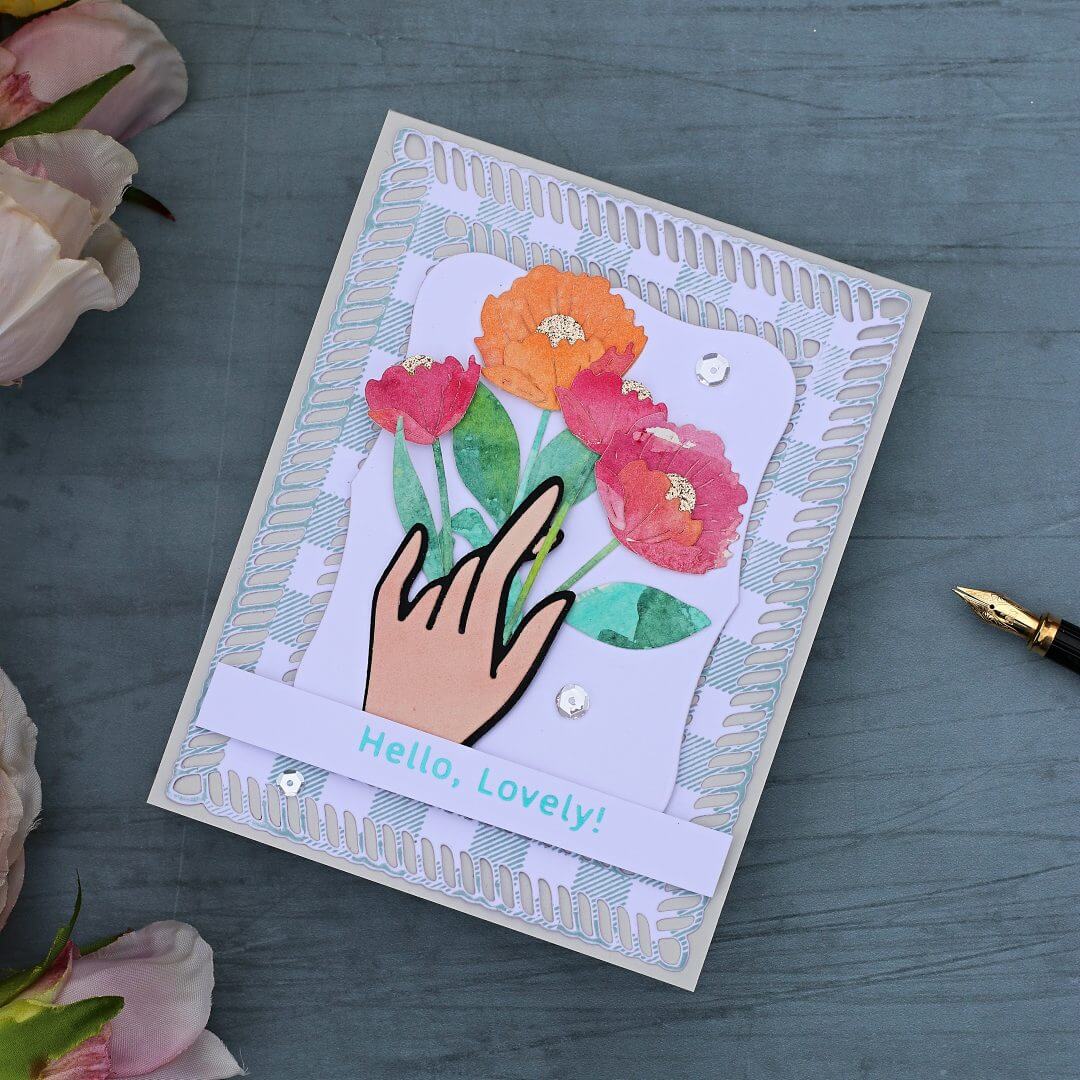
I love Becca's elegant designs, they are very versatile and this time I was keen to try something new.
So, I die cut a panel using three dies in Elegant Twist Rectangles Etched Dies and then I stamped this panel using a large Plaid Background Stamp using also Speckle Egg Oxide Distress ink.
Then, I simply added a topper made using dies from"Handing You a Smile", the Spellbinders Small Die of the Month- June 2020.

Elegant Twist Decorative Card Base
This card features a simple idea to use any of the Elegant Twist dies to create beautiful die-cut borders or patterns directly onto the card base.
This mini card measures 4x 4 inches.
- I simply added a stamped background panel and I adhered over it some flowers I also made using "Handing You a Smile", the Spellbinders Small Die of the Month- June 2020.
- To make these flowers, I simply added two washes of watercolor paint over watercolor paper. Allowing to dry the paint between washes and then I die cut the paper.
- I embellished with sequins and I also added a foiled banner made using Moondust Glimmer Foil and one of the sentiment is from Borders and Sentiments Glimmer Hot Foil Plates.
Elegant Twist Decorative Background Elements

- For this card, I used a large Plaid Background Stamp to stamp directly on the card base.
- I die cut a panel using 3 dies from Elegant Twist Ovals Etched Dies and I used this panel as a decorative element or additional layer in the background.
- I then stamped a large floral cluster I applied quick colors using Copic markers and I die cut it using coordinating die.
- I then die cut the image using the largest oval from Elegant Twist Ovals Etched Dies to then add the stamped image over the oval background shape.
- I added a foiled banner I made using Polish Brass Glimmer Foil and one of the sentiment is from Borders and Sentiments Glimmer Hot Foil Plates.
Elegant Twist Decorative Gift Box Topper


This box measures 5"x 4" inches and it is 1" inches tall. To make it you will need 2 pieces of cardstock :
- 1 white that measures 7 x 6 inches ( Box Lid).
- 1 grey that is 1/16 " shorten than the withe ( Box body).
- I scored both pieces 1" inch around the edges as the box it is 1" inch deep.
- Fold, cut, and glue the box flaps in place.
I usually cut both pieces to the same size if the box body and lid are the same deep.
Then I trim 1/16" inches along two sides of the piece that I will be using for the box body. This guarantees the perfect fit of the lid.

Making the large flower was very easy too, I used Sweet Cottage Flower die set by Becca Feeken.
- First, I die cut the 3 different petals sizes in the set out of smooth cardstock 80 lb.
- Then I die cut an extra small flower to make the top part of the flower.
- Using a sponge and blending brushes, I added colors to the cardstock using Sqezeed Limonade, Riper Permission, Aged Mohagony Distress Inks. For the leaves, I used Moved Lawn and Evergreen Bough Distress Inks.
More Spellbinders Decorative Dies on Offer

This bundle includes 4 die sets and 4 glimmer hot foil sets.
- Essential Circles Dies S4-1039
- Essential Glimmer Circles Glimmer Plates GLP-15
- Essential Squares Dies S4-1037
- Essential Glimmer Squares Glimmer Plates GLP-151
- Essential Rectangles Dies S5-411
- Essential Glimmer Rectangles Glimmer Plates GLP-152
- Essential Ovals Dies S4-1038
- Essential Glimmer Ovals Glimmer Plates GLP-153
That's all for today I hope you like the ideas in this post.
Happy Crafting
X
Bibi
Supplies List
Just a note to let you know that when you buy through the links in my blog, I get a small commission at no extra cost to you.
Thanks for your support!